
Nail designs are ways to beautify and embellish your nails after you might have had your manicure and pedicure done. And in order to make them look more beautiful and attractive, you can get some beautiful art on them.
Nail arts are quite expensive, and some people might not have the budget to get professional work on their nails, this is why we would be providing you with some beautiful nail art designs that you can do yourself in your room or dorm.
These designs won’t cost you much, though you would need some tools to get the designs on your beautiful nails, if you happen not to have one or two tools that are required, then improvise. Yeah, improvise by looking around your room for things you think can work in place of some tools which you happen not to own and your best friend or roommate does not have them too.
Few Things You Need to Tick Off Before Applying Nail Colors
- Ensure your nails are filed round, do not file your nails flat. When you file your nails are filed flat, they can easily get chipped and as a result, you might get injured. But when you make it look spherical, your nails are safe and you are also safe from harm.
- Another thing is to ensure your nails are clean. Clean beneath your nails by clearing them off dirt you might have gotten in there, either through itching your scalp or skin or from other activities. Also, use some rubbing alcohol to get off the nail polish residues you might have on your nails.
- Cutting off the nail cuticle is advised against, as it exposes you to infections. So if you used to cut off your cuticles or perhaps bite on them, then you need to stop that.
Every part of a lady’s body garners some level of attention, down to the toenails. So as a lady, you wouldn’t want to be caught unkempt with either the wrong outfit or a poor manicure. And getting a good manicure done cost a few bucks. This is why we are providing you with DIY nail art designs you can do at home. You do not have to always go to a professional to get your beautiful nails nicely polished.
We will be providing you with a step-by-step tutorial on how to paint your favorite nail art design yourself. As well as listing the tools that will be needed to achieve each design.
Simple Nail Art Designs for Beginners at Home
To get started with this nail art adventure at home as a beginner, you would need a few things, you need to have nail polish of several colors, a stripper brush (this is a brush with small bristles used to make stripes), cello tapes, loose glitters, striping tapes and any other tool you can lay your hands on. The tools are not limited. So, let’s see some easy nail art designs you can do at home.
1. Smiley Nail Art
The first nail design we would like to start with is the smiley nail art. 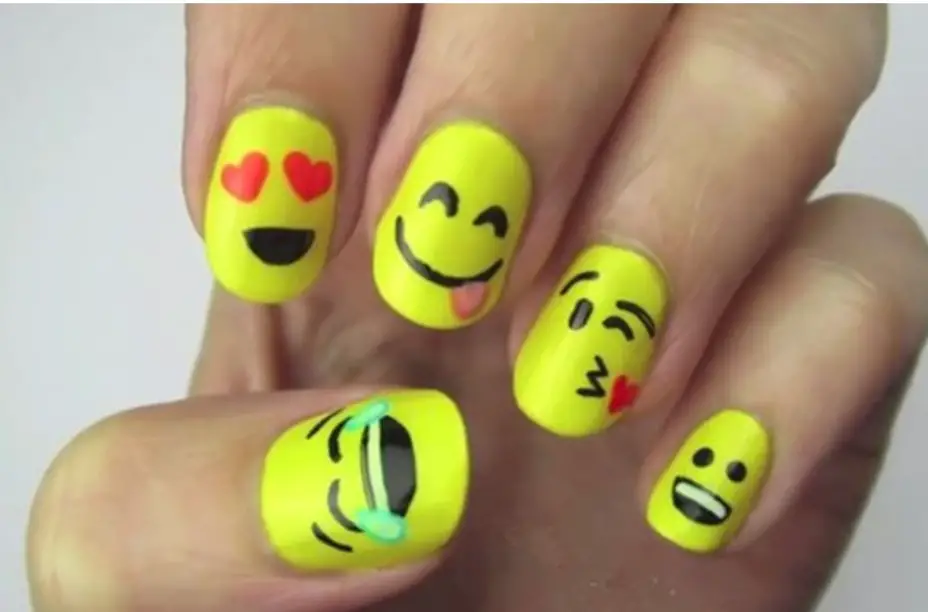 Everyone happens to love smileys, as they are expressive, they help us express our moods. And having your nail painted in your current mood is totally a good vibe.
For this design, you would need a few things;
- A yellow nail polish
- Red, white, and black nail polish
- A stripper brush
How to Apply;
- Apply yellow nail polish as the base color, as that is the background of every smiley.
- Leave to dry, before proceeding to draw in the expressions. If you do not let the base polish dry before drawing in the expressions, you would have a lot of smudges on your nail, and you won’t like that. So be patient, do not hurry.
- When the nails are dried, pick up the stripper brush and the other nail colors and start making the curves to form the lips, and another long curve to form a tongue-out expression. The smileys can be easily drawn by having an image of the smiley beside you, then you simply look at it, then draw what you see on your nail. To have a nice job, it’s better to practice on a sketch pad using the same tools before drawing on your nails.
2. Watermelon Nail Art
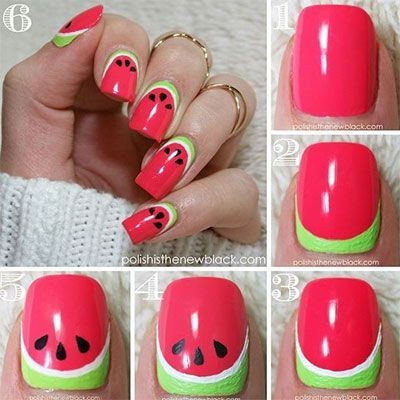
You are about to have watermelon on your nails.
Materials Needed
- You will need a stripper brush
- and the necessary nail colors to achieve this.
How to Apply
- To get started, the first nail polish to apply is green polish, as it serves as the hard part and base of your watermelon. You do not have to paint all the nails green, as it will just be below, you can paint the nail green halfway up. Then leave to dry
- Pick up your stripper brush and make a thin curved line in form of a U in white nail color. Trace the U in white nail polish to make it a little bit bold.
- Then cover the remaining naked nails with red polish.
- Leave that to dry, when it dries up, pick up your black polish and make the seeds in your watermelon.
3. Newspaper Nail Art
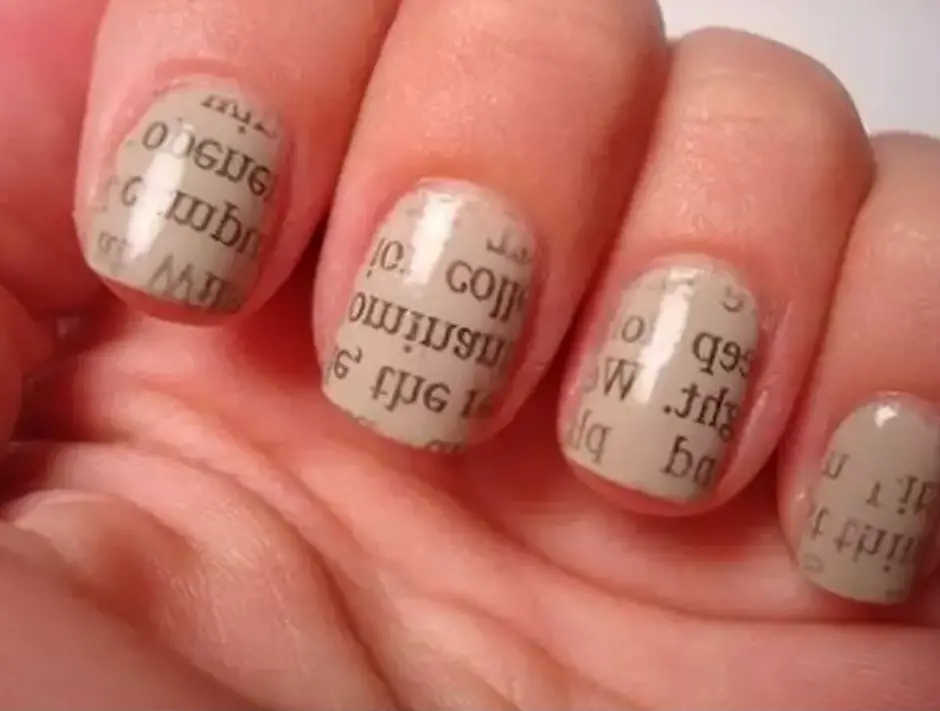
For this nail design, you will need;
- A newspaper,
- Some alcohol
- and nude or white nail polish.
How to do this design
- First thing is to paint the nail white or nude, leaving it to dry.
- Dip the nail in alcohol, place the newspaper on your nail, and do not move it while it’s placed on your wet nails, this will leave you with no so clear prints.
- So gently place the newspaper on your nail. After a few seconds, remove the newspaper and top-coat your nails. This design will have people flummoxed as to how you got some newspaper on your nails, and I’m sure you will be glad to give them the details as to how you got the prints on your nail.
4. Polka Dots Nail Art
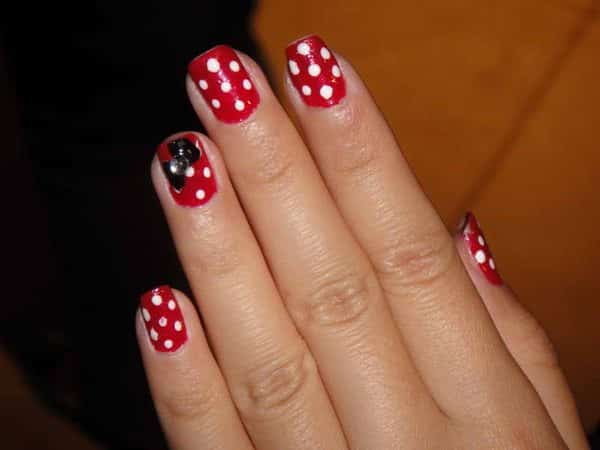
For this design, you will need;
- Your desired nail polish color
- stripper brush
- and another nail brush to make the dots,
How to Apply:
You can use a match stick to make the dots, by placing the tip of the match stick in the desired color you want as the dots and using the matchstick to drop a dot on your nail. You can use a stripper brush too If you want tiny dots. It’s quite simple, first is to paint your nail in the base color you want, leave it to dry, and then proceed to make the dots.
5. Pineapple Nail Art
 This is another fruity nail art design you can try out.
For this design, you will need;
- a yellow nail polish
- a green polish
- your stripper brush
- and a light brown or gold nail polish.
How to Apply
- First thing is to paint your nail with the base color, which is yellow.
- Leave it to dry, then proceed to make the slanted strips using your stripper brush.
- Then use the green polish to make the wavy effect at the tip of your nail.
6. Country Flag Nail Art
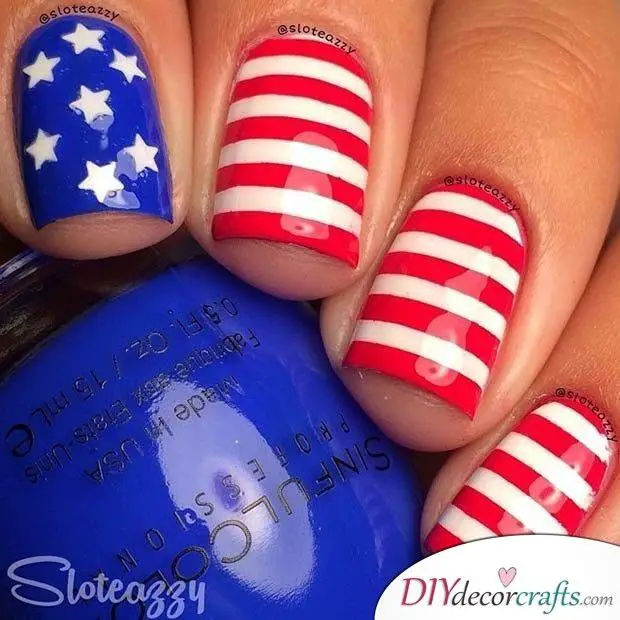
For a patriotic citizen who happens to love their country so much, you can incorporate your country’s flag on your nails. Wave your hands, as well as your flag. This is also a nice idea for when your country happens to be celebrating some historic events, perhaps Independence or other events.
The things you will need for this are best known to you, as you know your country’s flag better than a stranger, and you can draw your flag in your sleep. I’m certain you will use some nail polish, a stripper brush, and/or cello tape.
7. Symmetric Nail Art
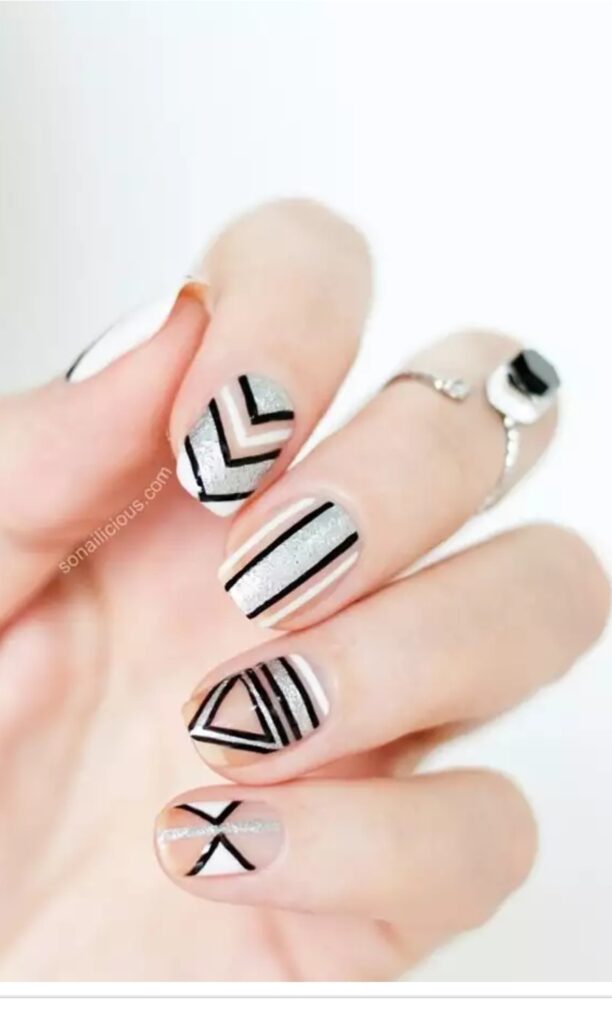
This is another beautiful and simple nail art design at home to do yourself for your beautiful self.
For this nail design, you do not need any new tools, the tools you’ve been using from the start of this adventure are still very much useful here.
Simply make the symmetry as you wish by using your stripper brush and your desired nail polish.
8. Studded Nail Art
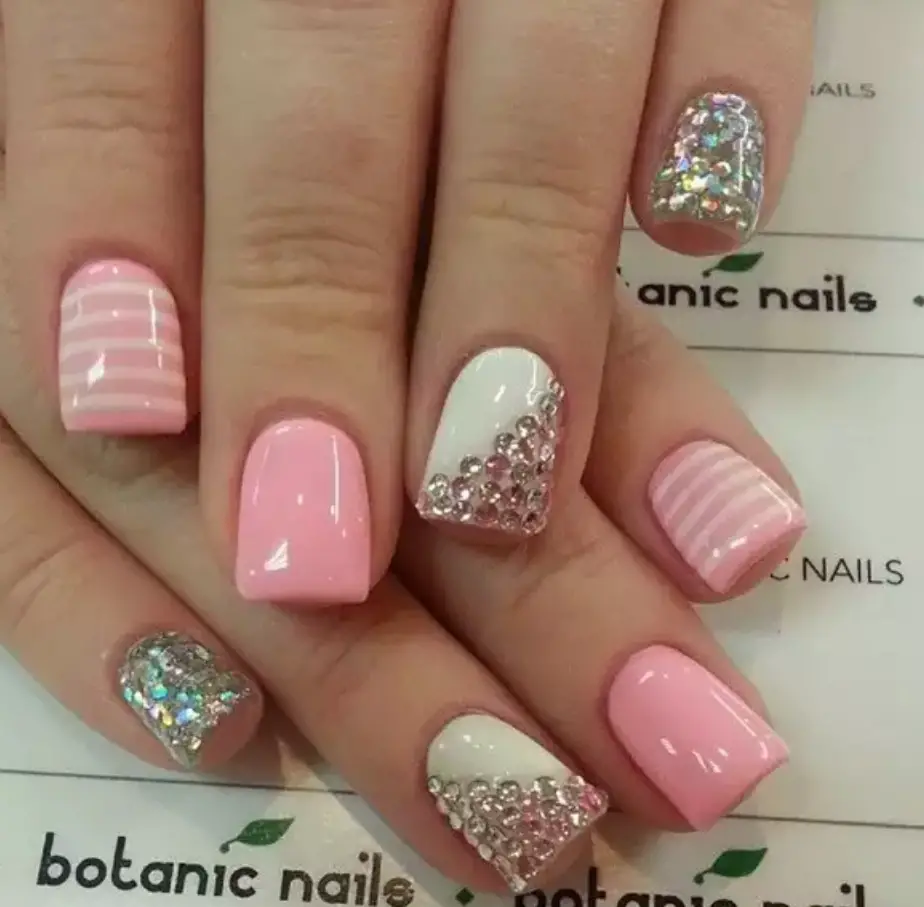 Every girl loves stud! Studs make things stand out. They add some atom of uniqueness to everything they touch.
Things you need for this design
- You need to get some studs, in whatever size and shape you desire.
- And some glue too, glue will be used to have the studs in place.
How to do this design
- The first thing to do here is to do paint the nail in your desired nail polish, it could be a single paint or mix some colors.
- When the polish is dried, you pick up the stud, it is advisable to use a picker to pick the studs as it will help you place them easily on your nail.
- Then you put just a drop of glue behind the stud before placing it in position on your nail. You can have one of your nails fully studded, while others are left with no studs.
9. Sticking Tape Nail Art
 Here is another beautiful design. This can be achieved with cello tape. You simply polish the nail with your color of choice, when it dries, you pick up scissors and use that to cut your cello tape in strips, and place it in strategic positions as you wish, then paint the space that is not covered with tape.
You can put the tape on vertically or horizontally. It is not a must to have all nails uniform in design, as far as they are similar.
10. Wavy Nail Art
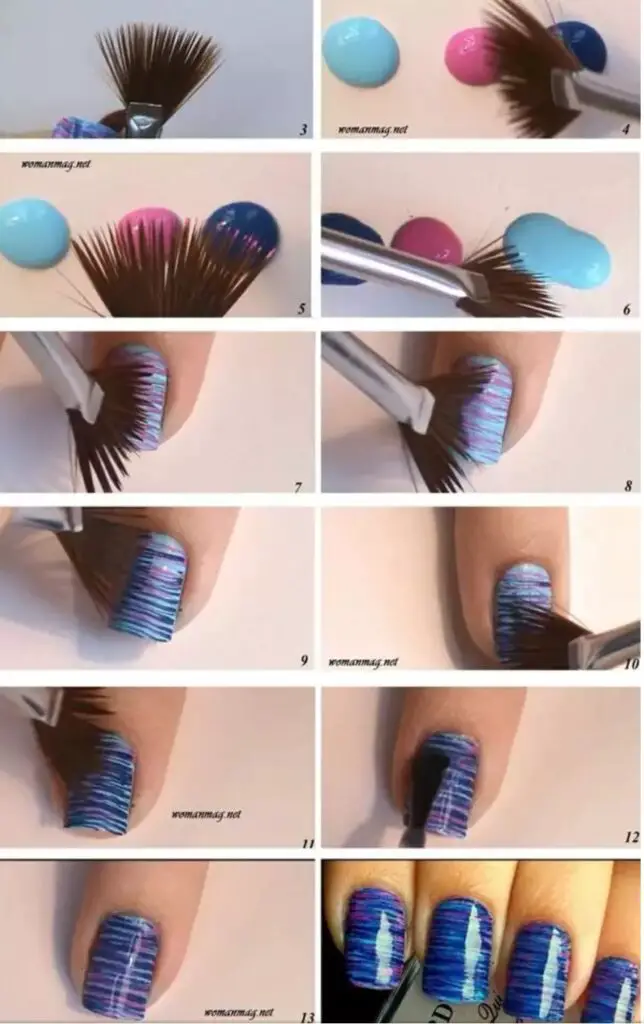 This design requires a fan brush, as it will be used to achieve the waves. Apply the base color you want and leave it to dry. Pour some nail polish on a board or paper plate. So when your nails are dried, you pick up the fan brush and dip in the paint poured on the board, then lightly sweep your nail with the tip of the brush.
It could be horizontal or vertical. Do as you wish, the only rule in nail art is to come out looking beautiful and creative.
This design is classy
11. Ombre Nail Art Design
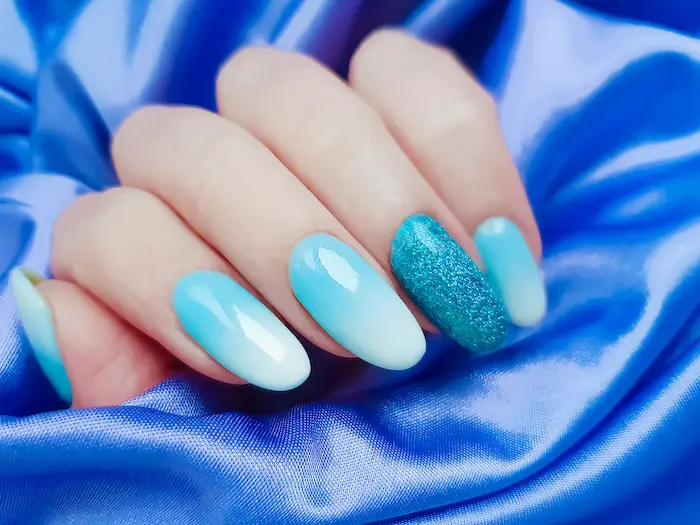
This design is for those who love gradient or ombre designs. Ombre or gradient holds different shades of a color. Blended in to form a beautiful gradient.
The tools needed to achieve this are;
- Two shades of nail polish. One has to be lighter than the other.
- A plastic sheet
- Few toothpicks
- Cotton swabs
- A clear nail polish
- Nail polish remover
- A little piece of sponge
The procedure to get this done;
- Apply the base coat
- Pour out the two nail polishes onto the plastic sheet, each staying by the other.
- Proceed to blend both together using a toothpick.
- Apply the blended polish on your nail (which should have dried up by now)
- To get a not-so-smooth nail like the one on the ring finger in the image, dip the sponge in nail polish and gently dab it on the nail.
- Clean up whatever stain you might have around your nails, by dipping the cotton swab in nail polish, and mopping the stains off.
12. Floral Nail Art Design
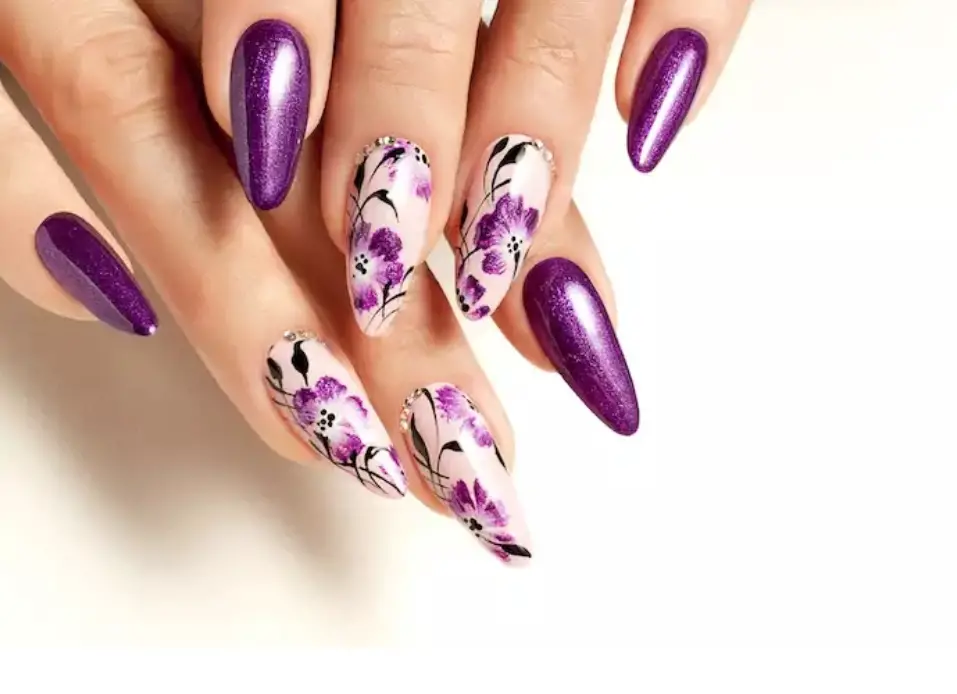 More than half of the total population of women around the world love flowers. The way they bloom and look cute on their stems makes them very much lovable. This nail art design is one you will love to have done, could be during spring. As the flowers bloom and fall during spring, so does your nails bloom.
The design might look a bit difficult, which might make you leave it out for professionals. But not to worry, this tutorial will put you through drawing a garden.
The materials needed to achieve this design are;
- White nail polish for the base coat
- Two tones of nail polish to make the flowers (e.g pink and purple, orange and yellow, etc)
- A thin nail art brush
- Clear nail polish for the top coat.
The procedure to achieve the design is as follows;
- Apply the white nail polish, that serves as a base coat. Coat it twice to make a firm base.
- Draw flowers by dipping the thin nail brush in one of the other two nail polishes. You can make a circle with the letter n or an inverted u to form the flowers.
- Put the thin nail brush in the other nail polish and trace out the flower drawn.
- If you have green nail polish, you can use that to draw stems beneath your flowers.
13. Starry Night Nail Art Design
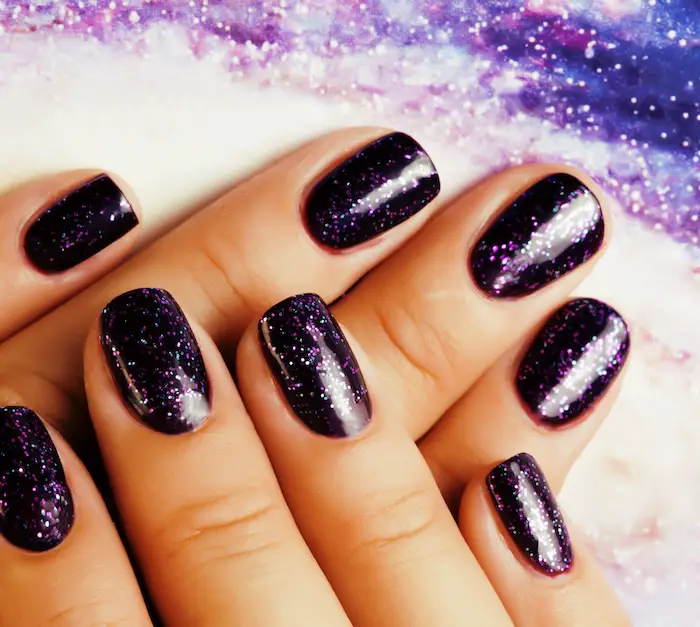
This nail art design is like having the galaxy in your hands, and you have the power to flaunt the galaxy. Everyone loves the stars, and how they shine so bright in the dark sky. Now let’s get to how to achieve this design.
Tools needed for this design are;
- Black or navy blue nail polish for the base coat
- Metallic nail polishes
- Toothpick
- Rectangular sponges
- A plastic sheet
- White nail polish
- Glittering nail polish
The step-by-step procedure to achieve the design is as follows;
- Apply the base coat, which is the black nail polish
- Apply another coat of the black nail polish, but leave the first coat to dry before you apply another coat. Then you leave the new cost to dry completely.
- Lay out the plastic sheet and pour some metallic nail polish on it.
- Slightly dab a sponge on the nail polish on the plastic sheet.
- Dab the sponge dipped in metallic nail polish on your nails.
- If you have another metallic nail polish, dab a new piece of sponge on it and dab on your nails again.
- Leave to dry.
- Pick up a toothpick and dip in white nail polish to make dots on your nails.
- Now use the glittering nail polish as a top coat.
That’s how you get the galaxy on your nails.
14. Halloween Nail Art Design
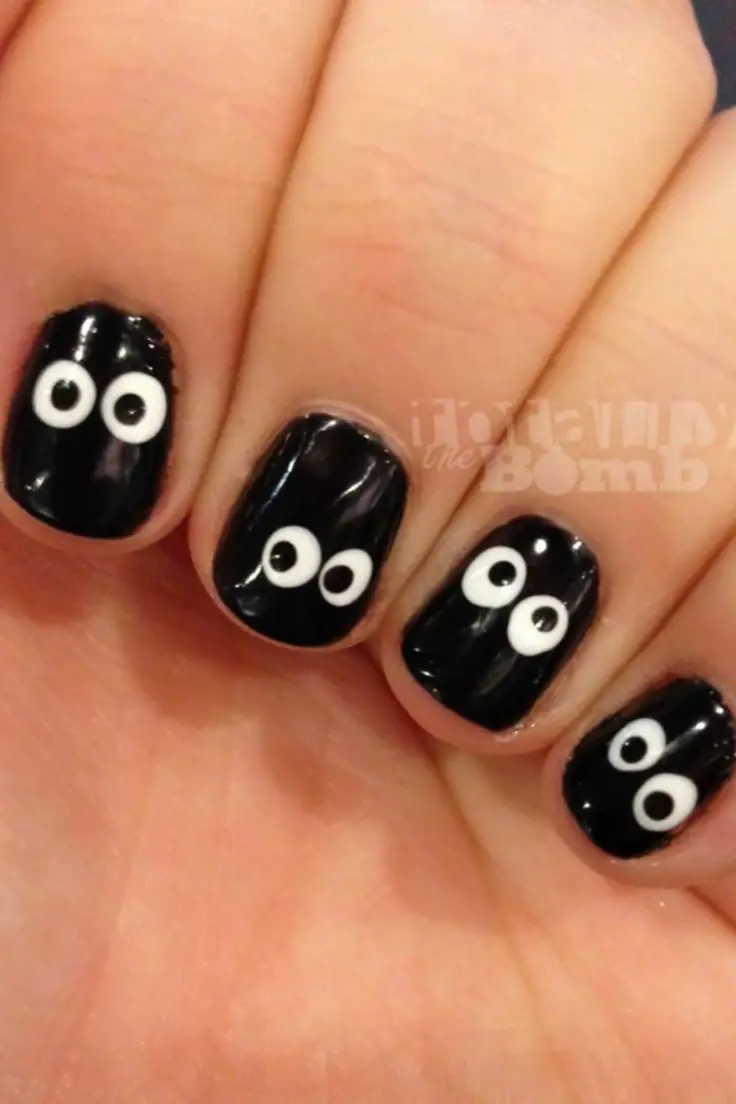
There is no limit when it comes to having fun and trying out different nail art designs. This Halloween nail art is perfect for the fright night. You and your girls can play around with some nail polish to achieve this design.
The materials needed for this design are;
- Black nail polish
- White nail polish
- Clear nail polish for the top coat
The procedure to get on with this design is as follows;
- Apply the black nail polish which is the base coat.
- Leave to dry.
- Then use the brush for the white nail polish to drop a big dot on your nail, in whatever corner you desire.
- Drop another dot close to the initial one.
- Leave that to dry too.
- Now use the brush from the black nail polish to drop a smaller dot in the white dot. Drop on both dots.
- Leave to dry.
- Apply the clear nail polish as that is the top coat.
Now your nails are Halloween-ready!
15. Two-Toned Nail Art Design
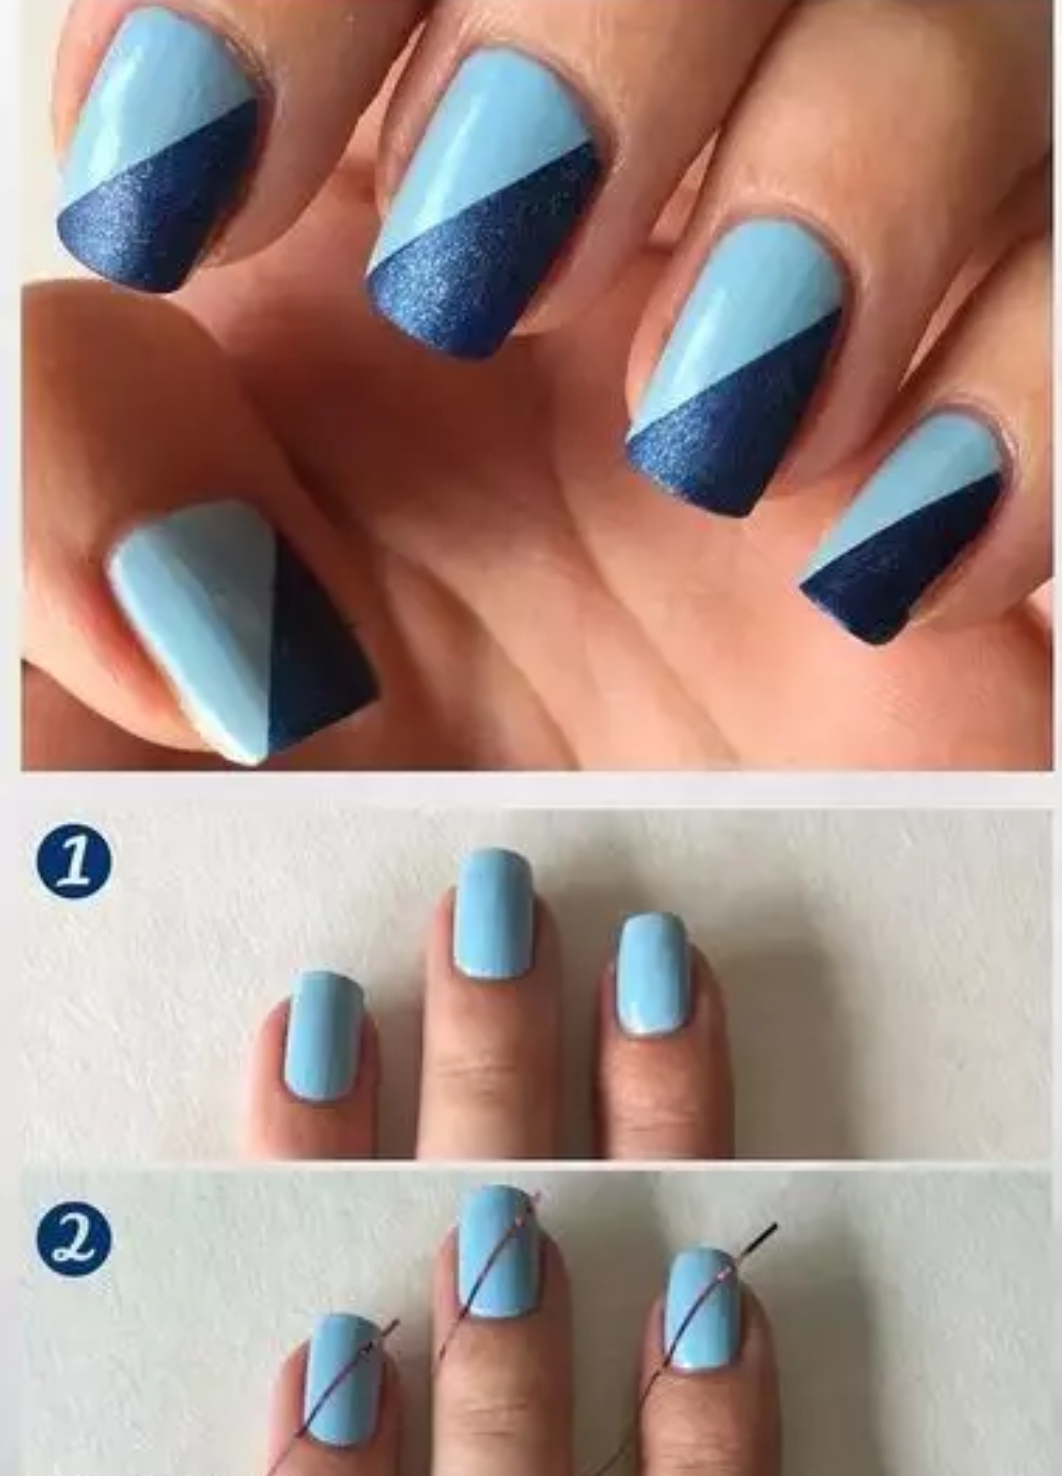
This is another beautiful and simple nail art design to achieve all by yourself, with no sweat. Here, you can blend in two tones of color to achieve this.
The materials you will need for this are;
- A navy blue nail polish
- A powder blue nail polish
- Nail strips
- Clear nail polish
The procedure to get this done is as follows;
- Start by painting the whole nail with one of the nail polish.
- When it dries, place a nail strip from one corner to the adjacent corner.
- Then paint one half in the other nail polish shade.
- Finish up with clear nail polish.
16. Vertical Strips Nail Art Design
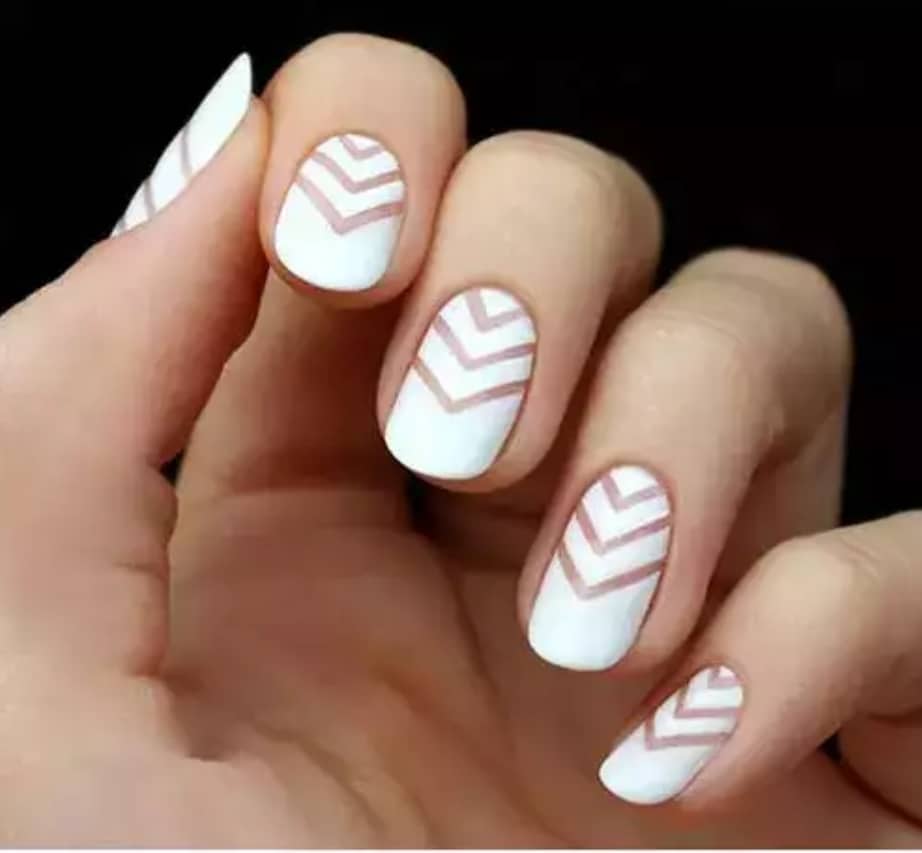
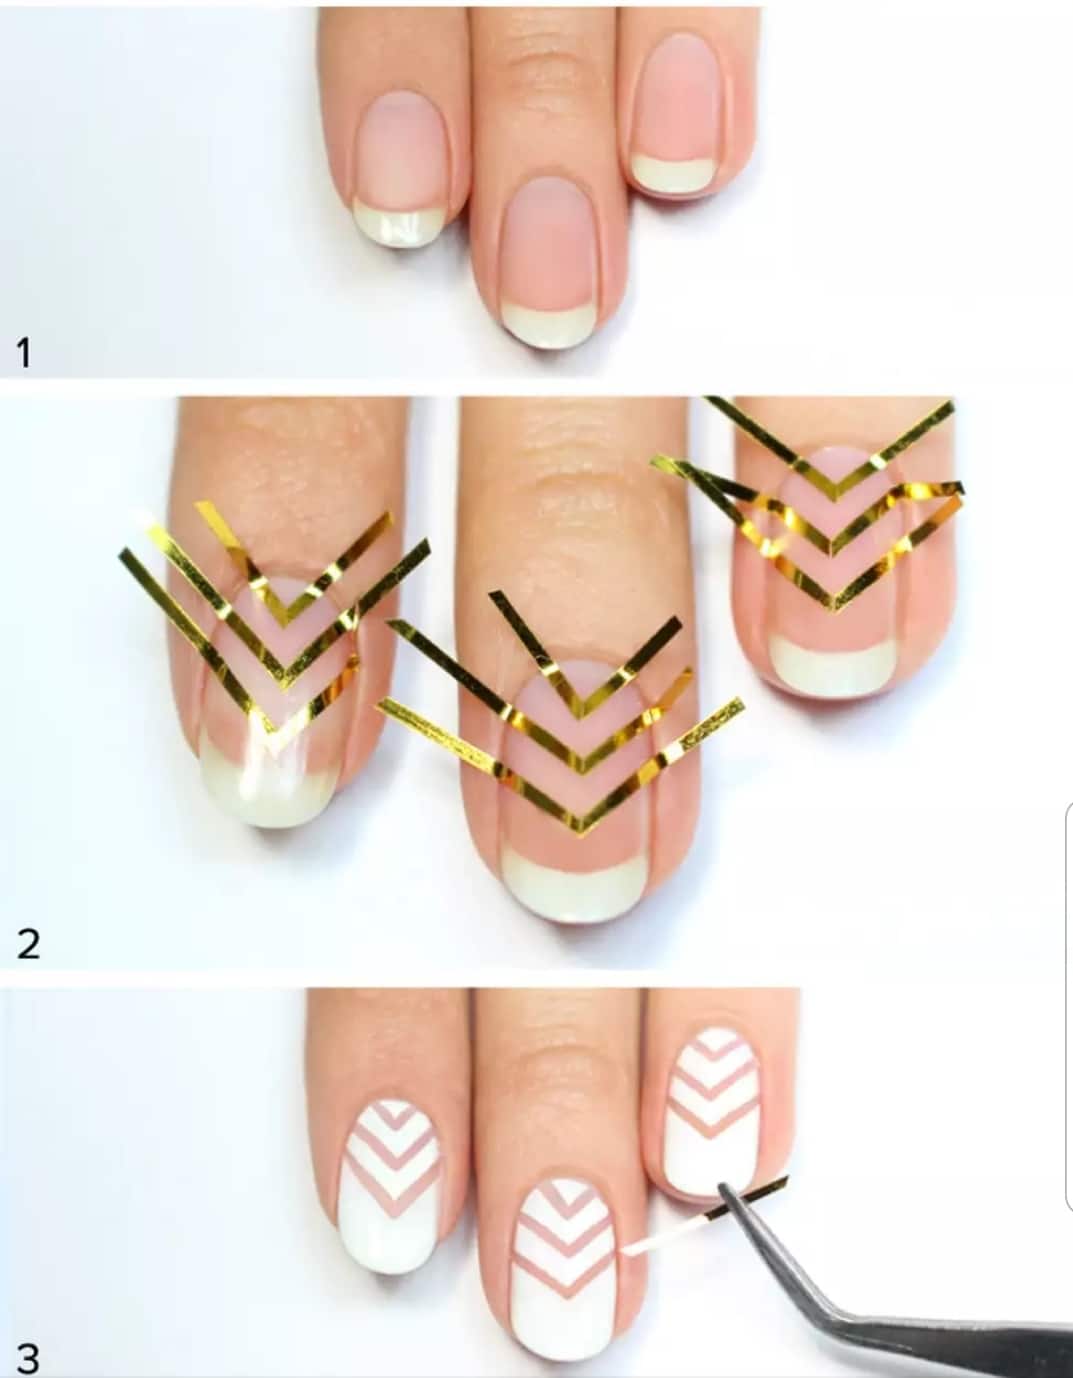
This vertical strip design is simple and classy. It speaks class and is minimalist, for people who do not like too much drama on their nails.
The materials needed to get this design are;
- A white or any other you desire nail polish for the base coat.
- Nail strips
- A clear nail polish
The procedures to get started with this design are as follows;
- Place the nail strips on your nails, forming Vs in whatever number of Vs you wish to have on your nails.
- Use the nail brush to swipe the white nail polish on your nails, do this gently so as not to move the strips.
- Before the polish gets dry, gently remove the nail strips.
- Leave to dry then apply the clear nail polish.
17. Musical Notes Nail Art Design

Music lovers, this one is for you. If are you into music or you are a music lover, then this design is right for you. It is quite simple to achieve, not worry.
The materials needed to achieve this design are;
- White nail polish
- Black nail polish
- A thin nail brush
- A clear nail polish
The procedures to follow to achieve this design are as follows;
- Apply the base coat, which is the white nail polish.
- Leave to dry
- Draw three horizontal lines using the black nail polish.
- Leave that to dry as well.
- Use the tip of your nail brush to make two dots with black nail polish as seen in the image above.
- Then use the thin nail brush to draw horizontal lines to connect the dots.
- Finish up by applying clear nail polish.
18. Coloured Clouds Nail Art Design
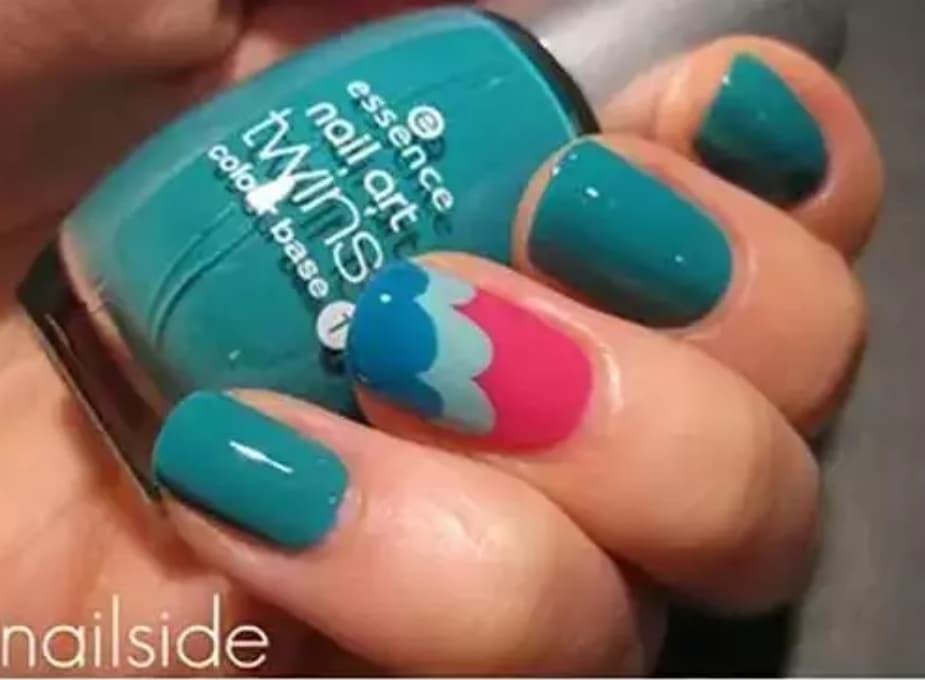

This design is colorful and beautiful. You would be having clouds in your nails, by the time you are done. Just that your clouds won’t be in one color.
The materials needed for this design are;
- A pink nail polish
- Aqua green nail polish
- A blue nail polish
- A turquoise nail polish (do not forget that you can use whatever colors you desire)
- A clear nail polish
The procedure to follow for this is as follows;
- Paint your nails with the aqua green polish, leaving out your eng finger.
- Paint the ring finger pink.
- Looking at the image, start creating the cloud by using turquoise nail polish to create vertical lines.
- Leave to dry.
- Then use the blue nail polish to create vertical lines on the turquoise lines, but not the same height.
- Then finish up by applying the clear nail polish.
19. Thin Lace Nail Art Design
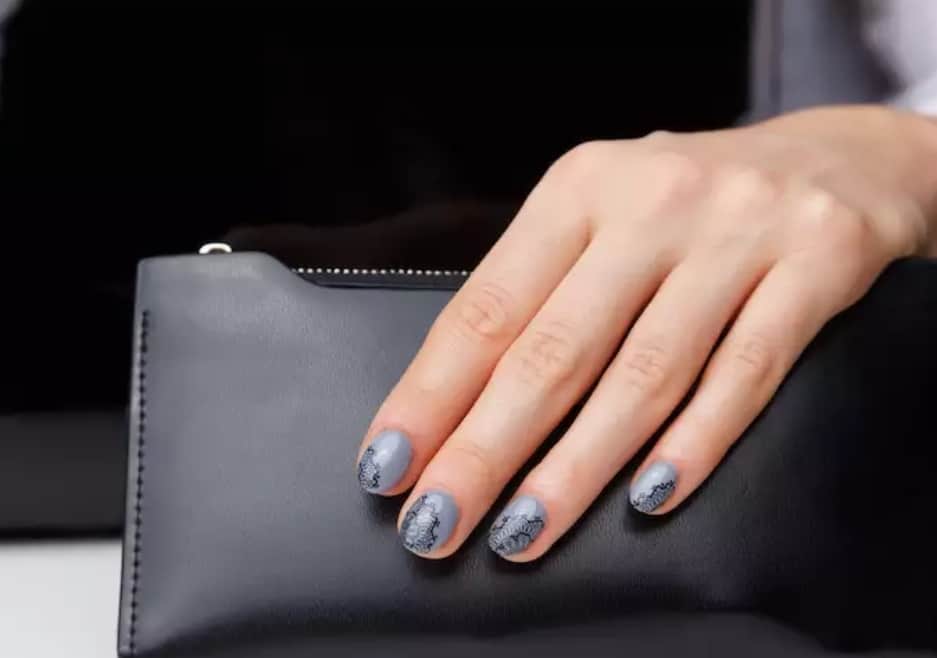
I guess everyone loves the feel of lace, especially when it is thin and soft. This design is also another easy one to achieve all by yourself.
The materials needed for this are;
- A grey nail polish
- Black nail polish
- Lace trimmings
- A scotch tape
- Clear nail polish
Procedures to follow are;
- Start by applying a base coat, the black nail polish
- Leave to dry.
- Place the lace trimmings on your nails in whatever corner you wish.
- Secure it in place with scotch tape.
- Then apply the grey polish over the lace.
- Pull off the lace trimmings.
- Then apply clear nail polish.
20. Rainbow Nail Art Design
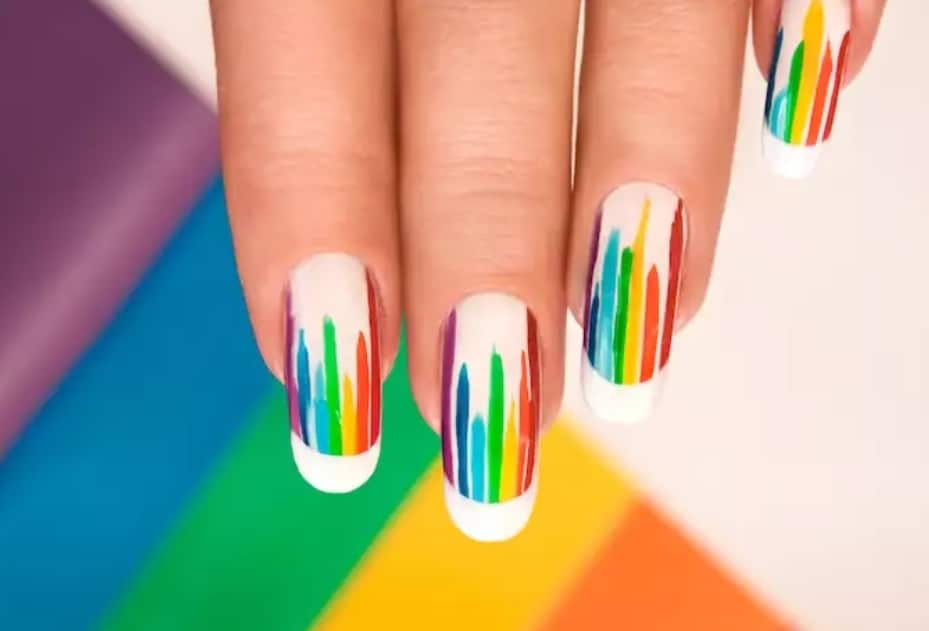
This is another colorful design, and who does not love colors? Colors add some level of brilliance and vibrancy to whatever it touches. The design does not require perfection.
The materials needed are;
- Blue, white, green, yellow, red, orange, and violet nail polish.
- A clear nail polish.
- A thin nail brush.
The procedure to achieve this is as follows;
- Start by applying a base coat of white nail polish.
- Leave to dry.
- Then start drawing in different colors of none identical vertical lines using the thin nail brush.
- The lines shouldn’t be the same size.
- Arrange the colors as you desire.
- Then finish up with clear nail polish.
21. White And Orange Flames Nail Art
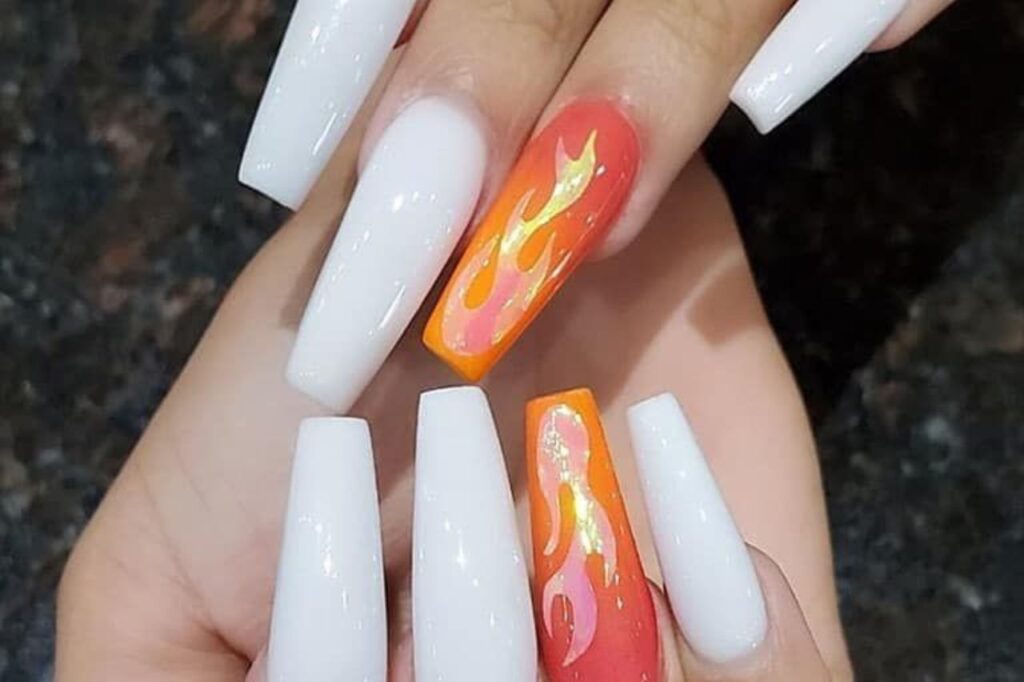
White and orange flames are a great choice for a Halloween costume or for your next themed party. It’s very simple to achieve and can add the perfect finishing touch to any outfit. The color combination is eye-catching, playful, and rich at the same time.
The materials needed are;
- A white nail polish
- Orange nail polish
- Yellow nail polish
- Black nail polish
- Nail art strips
The procedure to achieve this is as follows;
White and orange flames have been a popular nail art design recently. We are going to show you how to do it. Start with a fresh manicure. Apply white polish on some of the nails while you leave the other nails for the orange flame effect.
Paint the polish in diagonal stripes to create flames. Orange is added by painting over the orange with orange and yellow polish, creating a gradient effect for the flames.
22. Watercolors Nail Art Design
The watercolor nail art design is a popular trend without the hassle of learning how to master the actual watercolor painting, although it is still in the same conceptual category. It is a simple yet very effective way to give your nails a new lease on life and take your manicure to an incredibly stylish level.
The materials needed are;
Different polishes you wish to use.
The procedure to achieve this is as follows;
For an art-inspired manicure, paint on a base of clear polish and then mix several different colored polishes into the clear polish. Paint loosely on your nails to achieve a watercolor effect. Add glitters and stones as much as you like.
23. Love Doodles Nail Art Design
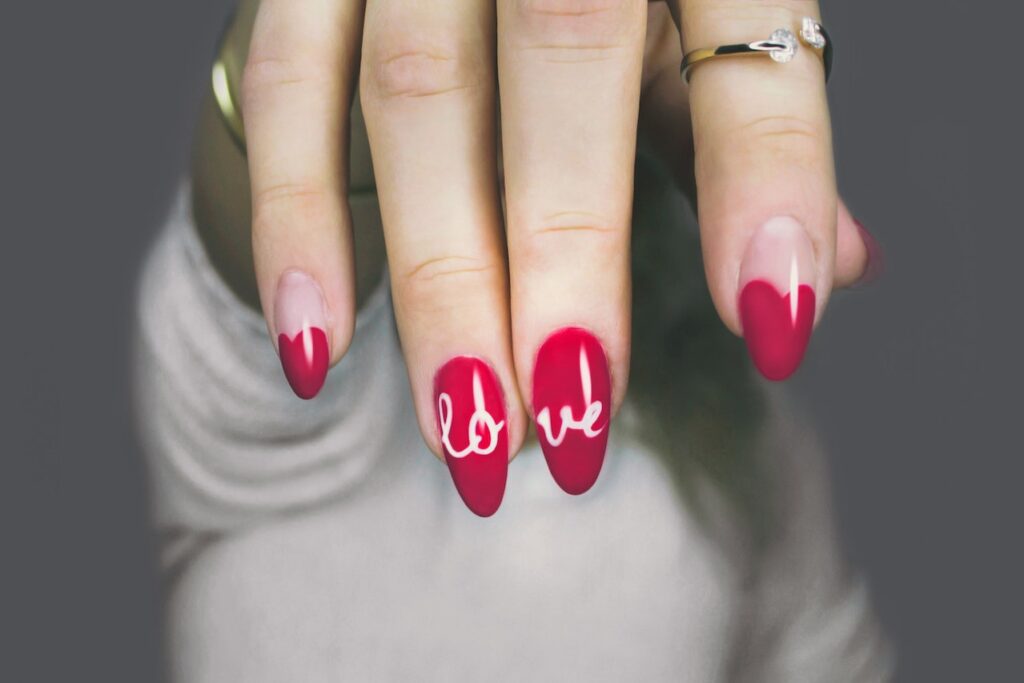
Love Doodles Nail Art Design is a nail art design that consists of love doodles in vibrant colors. These heart doodles on nails are quite popular nowadays and easy to make. These designs are totally achievable designs as a beginner. All you need is to set your mind to them and make sure your hands are steady. Then you can change nail art designs as much as you change your outfits.
The materials needed are;
- Nude polish
- Red polish
The procedure to achieve this is as follows;
Step 1: Paint your nails with a base coat.
Step 2: Paint half of the nails in nude polish with red polish in a heart shape at the tip. Let it dry for about 5 minutes until it is completely dry.
Step 3: Take some nail art brushes and paint the love doodles you like in nude color on the nails painted completely in red polish. Let it dry again.
Step 4: Once the design is dry, apply a top coat on all your nails and let it dry for another 5 minutes or so.
24. Heart shapes with polka dots nail art designs
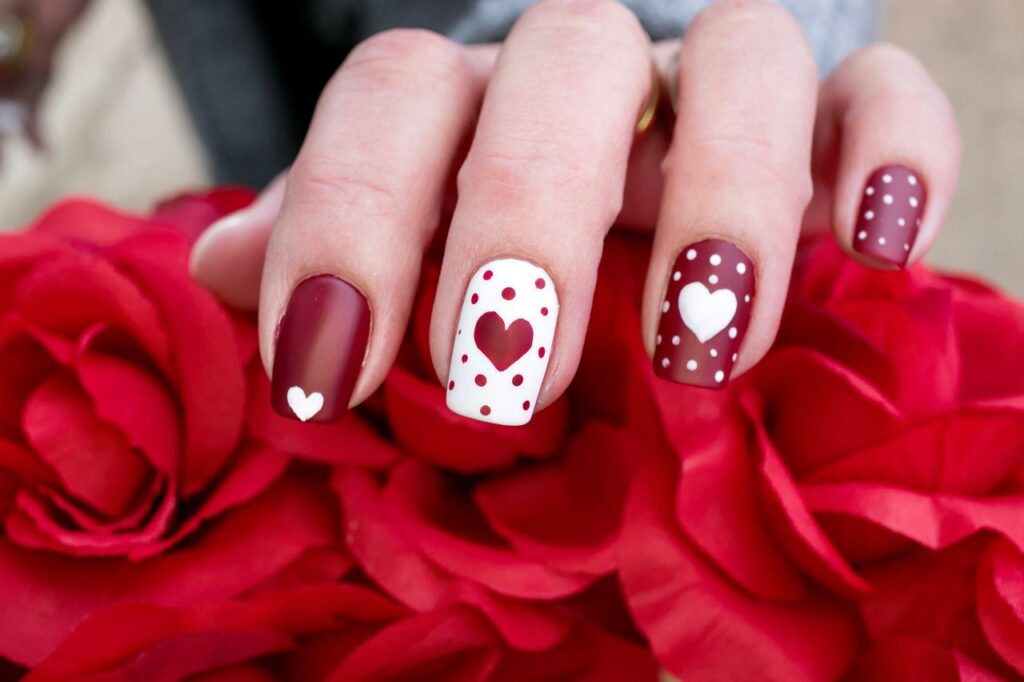
Polka dots and heart shapes nail art designs are a great combination of cuteness and elegance. The fact that the heart shape is just painted on top of the polka dots looks very cute.
The materials needed are;
- Burgundy nail polish
- White nail polish
- Nail art brush
The procedure to achieve this is as follows;
First, apply two coats of your favorite base coat to keep your nails strong and healthy. Then apply a thin layer of ridge-filling polish or ridge-filling base coat if your nails are particularly damaged – this will make it easier to apply the polka dots.
Next, take a dotting tool or toothpick and dip it into the burgundy nail polish, then create a series of small dots along each nail line. Finally use a dotting tool dipped in white nail polish to top off each burgundy dot with a small heart shape. Do the same thing again but now vice versa with the white as the background.
25. Rainbow nail art designs
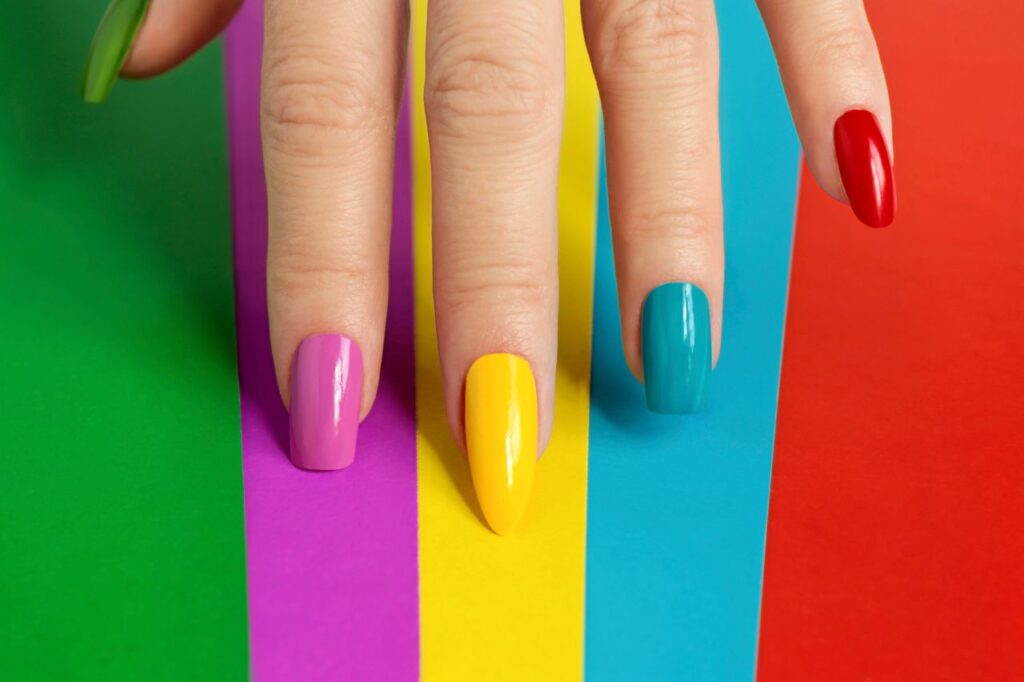
Rainbow nail art designs are a colorful way to dress up your nails, perfect for a fun night out or just to brighten up a rainy day. But don’t worry, these nail art designs are very easy to achieve and will leave you with plenty of time.
While there is no strict formula for creating a rainbow look, the color order usually goes red, orange, yellow, green, blue, indigo, and violet.
The materials needed are;
- Nail polishes in the rainbow colors
The procedure to achieve this is as follows;
All you need to do to apply coats of the different polishes once then do it again until you have the perfect nails. Apply clear polish on each hand after you are done.
Final Words
All the above nail art designs can be created at home by beginners who want to save money. The designs are beautiful and classy, and with the guidelines shared here, you no longer need to spend money at a salon or spa to get these designs done, you can do it yourself on your bed or couch.